Pages

Dynamics

The Moving Man
Click to Run

download java if this is not working for you:

Remember the ENGR flowchart?


18.2 Two major divisions of Dynamics:

1. kinematics
- study of motion without reference to the forces causing the motion
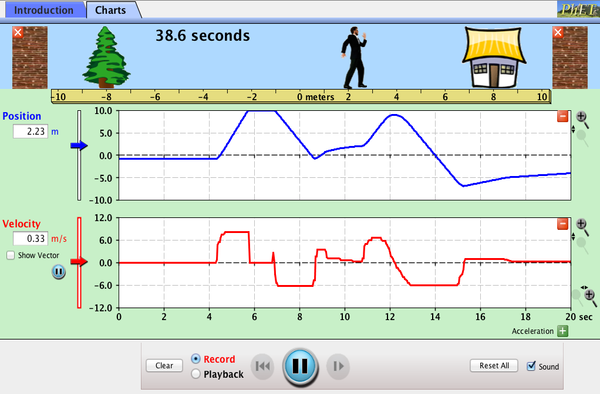

Kinematics game:
http://phet.colorado.edu/en/simulation/moving-man


2. kinetics
- relates forces to motion


Newton's Laws of Motion:

1st law:

A body in motion tends to stay in motion.


A body at rest wants to stay at rest.


ie - things want to keep doing what they are doing, you have to apply a force if you want it to change what it is doing.


Inertia = the resistance of any physical object to any change in its motion


2nd law: Force = Mass * acceleration

The acceleration of a particle is proportional to the force acting on it and inversely proportional to the particle mass; the direction of acceleration is the same as the force direction.


Large m, Large F.... small F, small m

F = ma

Constant acceleration


3rd law:

The forces of action and reaction between contacting bodies are equal in magnitude, opposite in direction, and co-linear.


Law of gravitation:
The force of attraction between two bodies is proportional to the product of their masses and inversely proportional to the square of the distance between their centers.


Kinematics:


If position changes linearly with time...


If position changes non-linearly with time:


 or - 

x(t) = V.t + 0.5at^2

acceleration = change in velocity / change in time

a = 110/4 = 27.5 ft/s^2

x(0→4) = 0 + 0.5*a*t^2 = 0.5*27.5*4^2 = 220 ft

x(4→6) = V.*t + 0 = 110*(10-4) = 660 ft


Try setting up an excel file that calculates:

  • distance, 
  • velocity, 
  • acceleration. 


Find the area under the curve between times "t1" and "t2". 

Area = triangle + rectangle


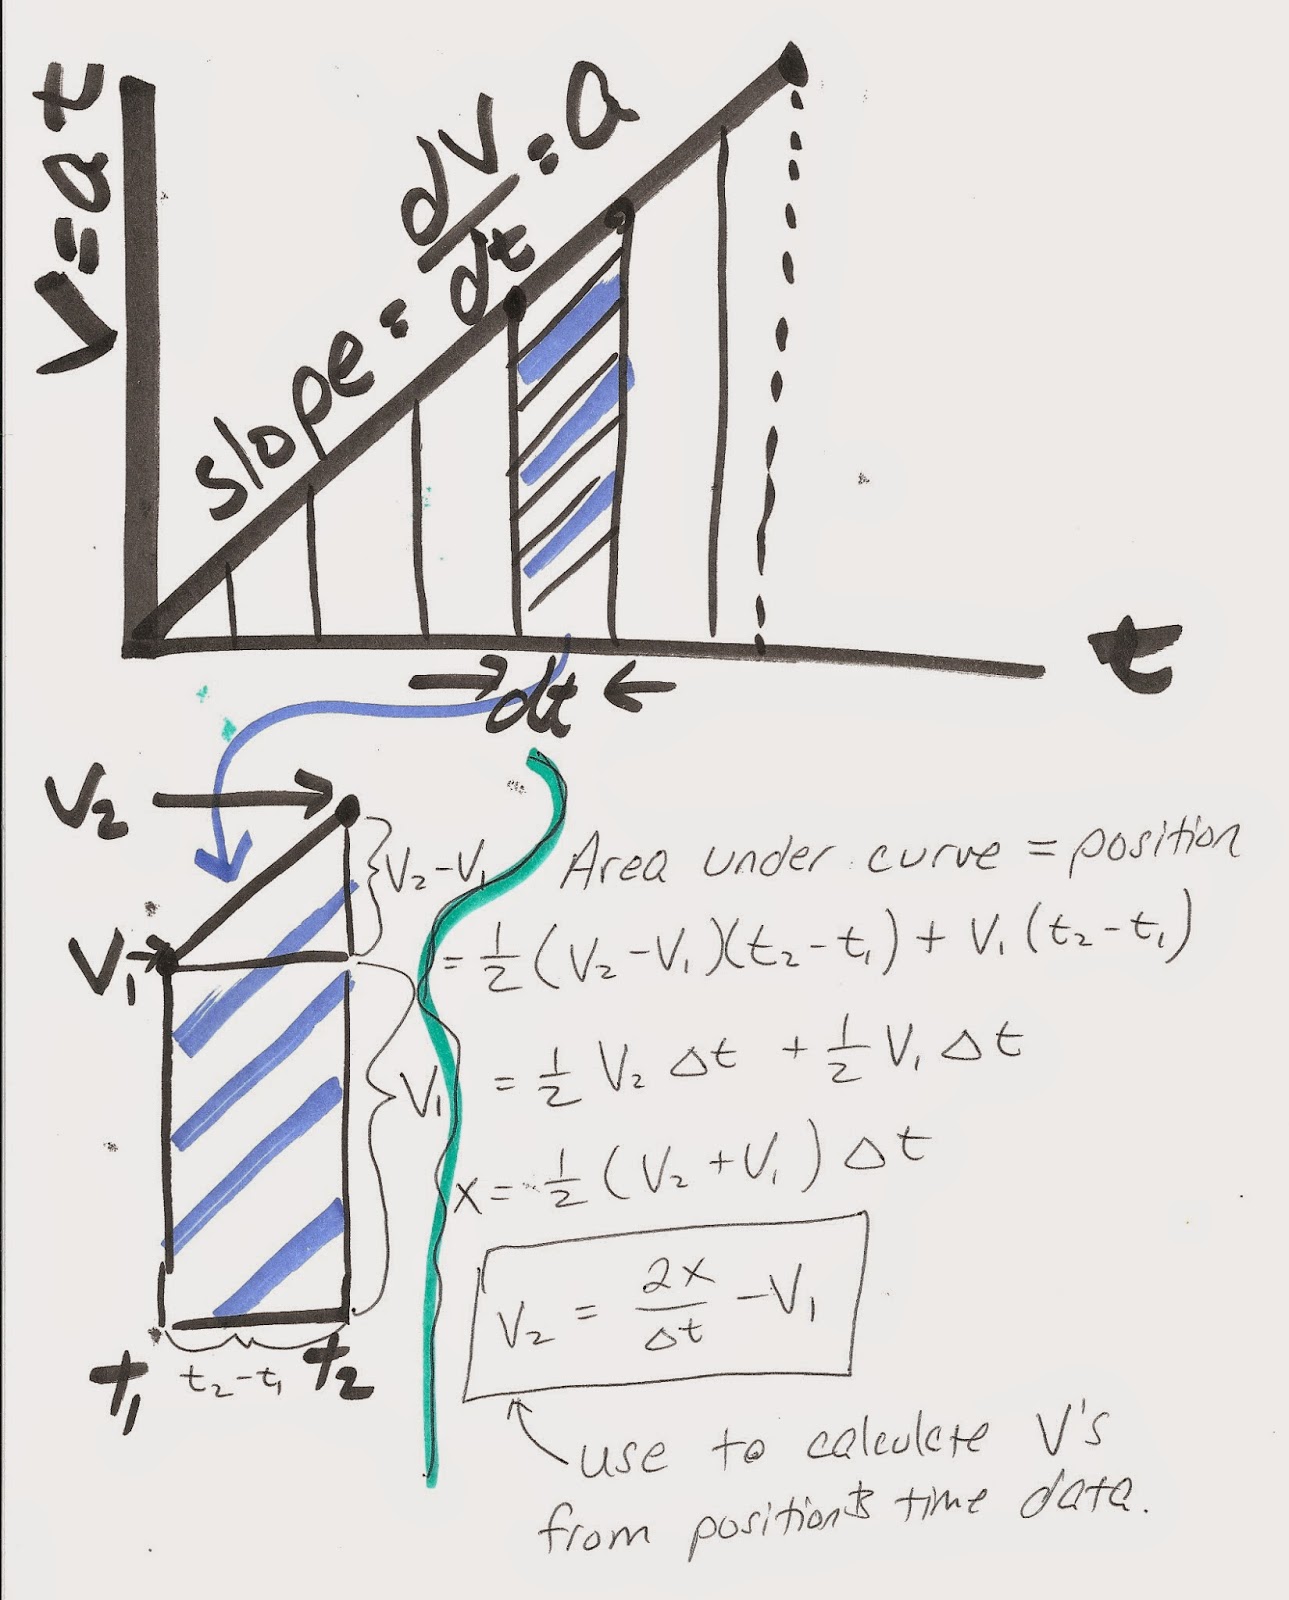
V2 = 2*(x2-x1)/(t2-t1) - V1

a = (v2-v1)/(t2-t1)


If you only had the distance and time data below, could you figure out the velocity and acceleration?


Accelerating to top speed from t = 0 to 4 sec
velocity is increasing with time.


Constant Velocity, from t = 0 to 10 sec
Velocity = slope = dx/dt


Displacement for time = 0 to 10 sec


Velocity
Area under curve = (Velocity)*(time)
                            = (feet/sec) * (seconds)
                            = feet
                            = distance traveled


Acceleration
Area under curve = (feet/sec^2) * (sec)
                            = (feet/sec)
                            = change in velocity


Mousetrap Car!!!

Can you figure out what the position, velocity, and acceleration graphs look like for a mousetrap car?


If you want, you could use your acceleration data to calculate some forces (but I won't make you for this lab, we'll just worry about s,V,a)


 Practice problem:


*************************************


Lab:
Collect displacement vs. time data by videotaping your mousetrap car.

Calculate velocities and accelerations from your position vs. time data.


Dynamics lab:
You will only need to write up the results section of this lab report, which includes:

  •  x(t), v(t) and a(t) graphs
    •  (Use an xy scatter plot, and label the x and y axes.)
  •  your video
  • your data
  • example error propagation calculations.


Last year's video link


Some example data sets:
time (seconds)

#1timedisplacement (ft)
7.3300
7.770.441
8.030.72
8.250.923
8.41.074
8.61.275
8.81.476
91.677
9.271.948


13.800
14.370.571
14.650.852
14.931.133
15.11.34
15.351.555
15.651.856
15.827
16.132.338
16.472.679
16.772.9710
17.13.311


28.700
29.270.571
29.630.932
29.91.23
30.11.44
30.41.75
30.571.876
30.82.17
31.172.478


tu:

Time (sec)tDistance (feet)
4.400
4.60.21
4.90.52
50.63
5.070.674
5.30.95
5.51.16
5.61.27
5.771.378
61.69
6.21.810


The data isn't perfect, it's better to calculate everything from a fit to the line, instead of from the data itself:


tdd (equation)VV equationa
00000
0.4410.9455334594.2978793.4819847.9136
0.722.02112543.9759054.750554.8791
0.9233.1120106945.9412345.3661762.7983
1.0743.9079284934.6710035.54532851.19435
1.2754.9859793856.1095065.4807485-0.3229
1.4766.0293085174.3237855.0693685-2.0569
1.6776.9790582895.1737124.3111885-3.7909
1.9488.0085250192.4519672.737534-5.82835


Use excel to fit an equation to your line -
right click on line on graph - add trendline - choose polynomial, display equation.


Inventor / CAD

Inventor, AutoCAD, and the whole AutodDesk suite are yours free as a student!
http://www.autodesk.com/education/free-software/all


Open up Inventor:


** Notice the tutorials available for use through Inventor (Tutorial Gallery) 

4 tiles: Parts, assemblies, drawings, and presentations.

1. Start by creating individual parts.
2. Assemble them together,
3. Create a set of working drawings


File→New→Part→
English or Metric? Choose units, open up a standard part.

Start in 2D, then Extrude into 3D:


Create sketch →


Choose a plane start drawing your 2D view on:


It's often best to use the origin... Draw a rectangle centered on the origin


You can dimension the rectangle as you are drawing it, or, change the length of it after you have drawn it with the dimension tool.

Double click on any dimension to change the size of your object.


Finish Sketch:


Extrude it


Note your extrude options:


You can choose the direction you want to go, and if you want to create a solid, or if you want to punch a hole in it.


Note: Each time you create a new sketch, or make a new extrusion, it is saves it in the folders on the left of your screen.  You can always go back, reopen your sketch, and change it.


Try out the Fillet command, r = 0.25


Next, let's hollow out the inside of our box - start a new Sketch, and select the top of the box as the sketching plane.


Click on the top of the box
Use the offset command


Use Dimension after you offset to set distance 0.14:


Finish Sketch
Extrude

Push the center out of the box:


Now, add a lip for the lid to slide onto:


Create 2 lines:
Sketch - Offset 0.07 in
Then offset the inner line back out 0.07.


Finish Sketch, push the lip down 0.20


Play around with the drawing tools - decorate the outside of your box!

Use the construction lines, Modify Tools, Constraints, and Patterns!


Explore the View Tab - choose a material, experiment with the different visual styles:


Move a material to the top, then click on the material, and select what part of your object you want to make out of that material.


 Save the bottom of your box, and open up a new part to make the top of it.


Make your Lid - decide on a tolerance so that it will slide onto your box easily!


Save your lid, notice that both of your parts can be accessed through the tabs at the bottom of your drawing space:


Now let's put the lid onto your box!
Open up an assembly:


Place both of your parts into your assembly:


Once you have both of your box pieces imported into your assembly, use constraints to snap your lid onto your box:


Notice the different types of constraints:


You can also constrain part of your object to planes in your coordinate system.


The constraints you create show up under your part.

Once you have made a constraint, move your part around to see which ways it can move, and which ways it is stuck.


3D has 6 degrees of freedom - 3 rotational, 3 translational.

You can see which of your degrees of freedom is still available under the view tab:


Constraints are a little tricky to get used to the first time around - changing views (top, front, right) and then moving your object around, helps you see how the constraints are acting.


Click on constraints to see what is paired up with what.

Change the distances the constraints act over - (lower left hand corner)

See if you can constrain the base so that it does not move, and the lid so that it can only move straight up and down.


Materials Testing:

Draw a rubber band that is held in place on both ends:


create something to hold it on the top


View→Slice graphics is nice when you want to see or sketch inside an existing object.


Add a rubber band:


Environments→Stress Analysis


Experimental design:  What is the best way to constrain the rubber band?


Once you are done, try making a simple sketch for your semester long project!